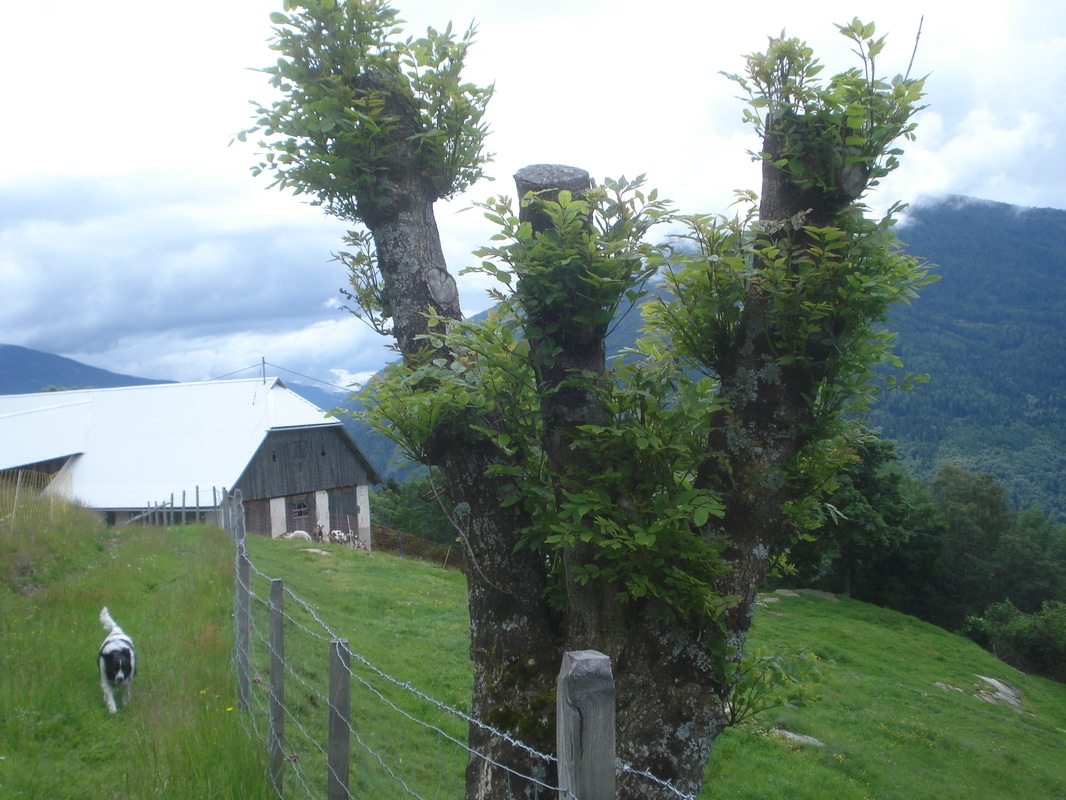
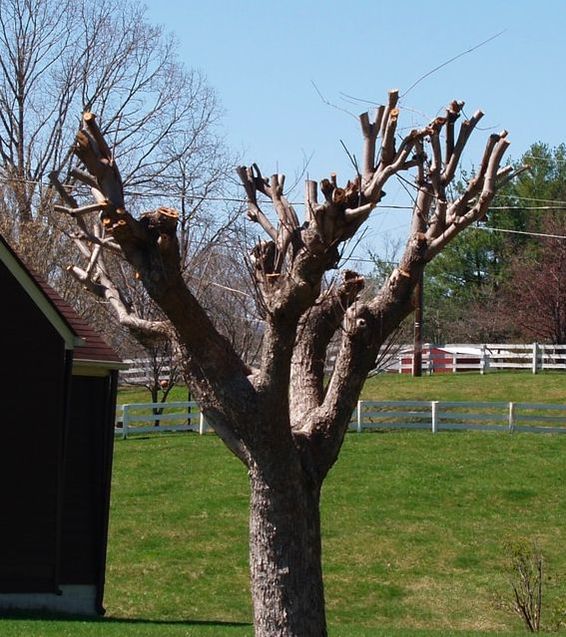
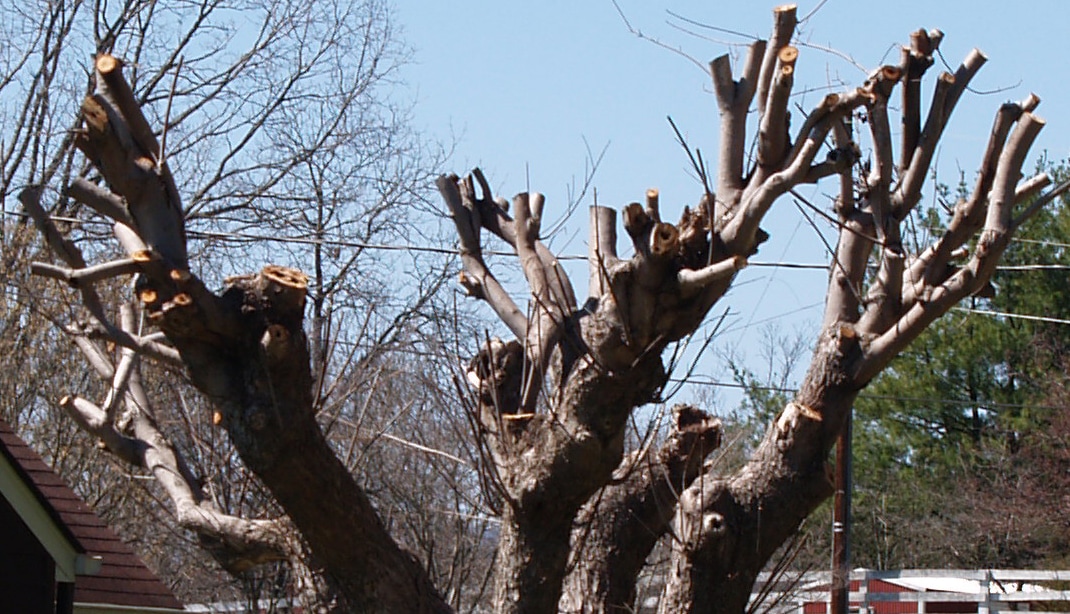
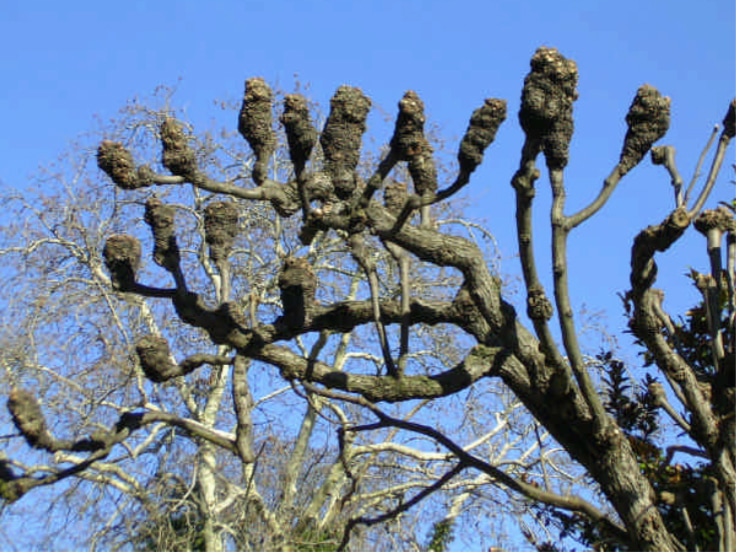
Pollarding Physiology and Practice Update By Dave Jacke In researching Coppice Agroforestry, we have struggled to find the kind of information we want and need about the resprouting of woody plants. However, we have succeeded in gathering significant numbers of informational “needles” about coppicing biology and ecology from a large haystack of sources. This is allowing us to pull together a pretty solid picture of the fundamental biology and ecology of sprouting. For example, we have synthesized a comprehensive framework of the kinds of buds that woody plants produce and their origins, functions, and physiology, and we have a sense of how this framework can help guide management practices. Until recently though, we had far more information concerning coppicing—that is, the cutting of trees or shrubs to the ground or just above the ground for purposes of harvesting woody resprouts ad infinitum—than we have found on pollarding. Pollarding would seem to be the same as coppicing, except elevated above the ground. Indeed, that is even how some people in Austria practice it (Figure 1). However, Mark and I have heard from various people and authors that pollarding is a training system not a pruning technique, but these same people gave us precious little practical information to go on for how one trains a pollard in the first place. In my travels around the world since we started work on this book, I have seen plenty of examples of people “pollarding” when really what they were doing was “topping”—or in some cases simply hacking at—trees and shrubs without understanding the physiological consequences that follow. Any arborist worth their salt seriously frowns on topping trees and letting them resprout, despite its frequency in, for example, Virginia (see Fig. 2), where I have seen it a lot. This practice consists of what arborists call “heading cuts,” where one cuts a branch or stem back to a stub, or to a lateral branch too small to assume the “terminal role” for that shoot. Most often the heading cut is made on a fairly large shoot that has already developed heartwood to one degree or another. When heartwood is exposed in this way, it tends to rot. The larger the stem diameter when the cut is made, the longer it takes for callus tissue to cover the wound and the more chances fungi and insects will have to get into the wood. Once rot gets into the tree, the tree will never heal. Woody plants do not heal, they compartmentalize. They have various “walls” they use to compartmentalize, but these walls operate most effectively only in living tissue, which heartwood is not.[i] A closer look at the cut stubs in Figure 2 (see Fig. 3) shows that heartwood rot is well underway in this specimen, and that there is little “system” to the pattern of cutting when the stems are pruned off. In contrast, pollarding as a training system involves planned cuts that leave a tree or shrub with “heads” or knobs of callus tissue that sprout continuously and yet prevent rot from getting into the stem. "Woody plants do not heal, they compartmentalize." I recently connected with Andrew Lyman, a board certified Master Arborist with years of experience managing a grove of pollarded European lindens (Tilia cordata) at an Italian Water Garden in southeastern Pennsylvania. These lindens are pollarded to keep the trees to a size and shape that meets the aesthetic goals of this garden. Andrew reiterated that pollarding is a training system that involves planning far ahead: one must start pollarding when the tree is young, or at least when the shoots to be pollarded are young and vigorous and have not yet developed heartwood. This is critical because when the full shoot diameter at the time and place of cutting contains living wood throughout, there is no heartwood available for infection by decay organisms, the living wood can resist decay effectively until it calluses over, and the wound can callus over in a short time, reducing the chance of decay entering the stem. To develop an effective pollard, one must use the first several years of a tree’s life to develop the overall form and architecture desired—forming scaffold branches at the right heights and spacing, for example. If you plan on cutting the pollards every year the branches can be closer together. If you plan on cutting the pollards every two or three years for fodder production, the branches and pollard heads will need to be further apart vertically and horizontally. The initial pollard cuts are topping or heading cuts made on small diameter shoots during the dormant season. Cut back to a point between nodes (leaf attachment points) on the shoot, that is, somewhere on the stem between the places where one or more leaves or side shoots attach to the main shoot. Each node also typically includes one or more axillary bud(s), which establish in the leaf axils when the parent shoot elongates—and often remain dormant until the tree is disturbed. If you cut back to a node, the axillary bud(s) at the node will grow vigorously and become the apex or leader of the stem, which is not what we want. We want the pruning wound to callus over and begin forming a “head” or knob of callus tissue from which adventitious shoots will grow. Unlike axillary buds, adventitious shoots form de novo (Latin, “anew”) from undifferentiated cells in the lateral portion of the stem, typically cambial tissue or callus tissues that cover wounds. The callus of some species (notably, most species of Quercus, Platanus, and Tilia, and some species of Acer, Alnus, Fraxinus, Liriodendron, Morus, and Ulmus) has a high tendency to form adventitious buds and shoots, and these are the best species for pollarding. In addition, dormant axillary buds near the head may sprout, and some may remain dormant while also multiplying, increasing the long-term sprouting potential of the plant. However, epicormic sprouts on the branch below the head are typically stripped off (not cut off) in an attempt to rip out any dormant buds at the base of these shoots. This may be for aesthetic or structural reasons, or it may increase the growth potential of the sprouts from the pollard head—I am at present unclear on why this is done. In any case, after the initial cuts are made, the wound will callus over and sprouts will grow just below and on the wound tissue. “A tree responds to pollarding by building a dense mass of woody fibers around the cutting points. This bulky mass resists decay and effectively divides the vigorous juvenile growth from the aging stem. Hence, the defensive and structural integrity of the tree is maximized using this pruning system because pruning cuts are made when biological reactivity of the trees is quite high and living cells quickly react to wounds and environmental changes and can develop a strong defensive reaction.” During subsequent dormant seasons, the sprouts on and near the head are cut back to the base of the shoot at the head, according to some authors,[iii] or to the first or second axillary bud on the sprout shoot above the head, according to Andrew Lyman. It appears that the base of any shoots growing off the head can or usually contains additional latent buds that formed when the shoot grew originally. These can remain dormant but still multiply in response to the experience of the sprouts getting pruned off, forming “collars” of latent buds on the pollard head. The callus tissue will keep growing over time, covering the wounds of each pruning experience, so that in a few years the head will be larger in diameter than the stem upon which it grows (Figure 4). It is critical that the callus tissue itself not get damaged during pruning! If the head is damaged numerous fine sprouts will grow from the newly wounded callus, but these often die within their first growing season, at least on Tilia cordata. According to Andrew Lyman, it works much better if the subsequent sprouts are actually axillary bud sprouts off the original shoots that grew from the pollard head. This concurs with our observations of adventitious shoots in general, that they tend not to be well attached to the tree, they often grow very thinly, and lack vigor—but this seems to depend on the species in question. If the subsequent shoots are actually from axillary buds, then they will probably grow much more vigorously and remain more firmly attached to the branch or head. Presumably the stubs of the shoots cut off the head will be subsumed by continued expansion of the pollard head, and that should reinforce the physical attachment of the stubs to the head.
So there you have it! This is what we have learned so far about forming pollards, though we are sure there is more to come now that we have cracked the egg open. I am about to travel to Colonial Williamsburg (Virginia), where, I recently learned, they have 30-50 very longstanding chaste tree (Vitex agnus-castus) pollards, and four large sycamore (Platanus occidentalis) pollards, both of which they use for making wattle fences, basketry, garden trellising, crafts, and kindling. I hope to learn more from their experience that we can share with you. As always, thanks for your support and interest! [i] For more information about Compartmentalization of Decay in Trees (CODIT) and the four walls, see Shigo, Alex. 1986. A New Tree Biology: Facts, Photos, and Philosophies on Trees and Their Problems and Proper Care. Durham, NH: Shigo & Trees Assoc. [ii] Ferrini, Francesco. 2006. Pollarding and its effects on tree physiology : a look to mature and senescent tree management in Italy. 1er coloque européen sur les trognes, Vendome, 26, 27 et 28 octobre 2006. https://www.researchgate.net/publication/238712279_Pollarding_and_its_effects_on_tree_physiology_a_look_to_mature_and_senescent_tree_management_in_Italy, accessed April 27, 2017. [iii] See, for example, Gilmore, Edward F. 2011. An Illustrated Guide to Pruning. Clifton Park, NY: Cengage Learning, Inc.
14 Comments
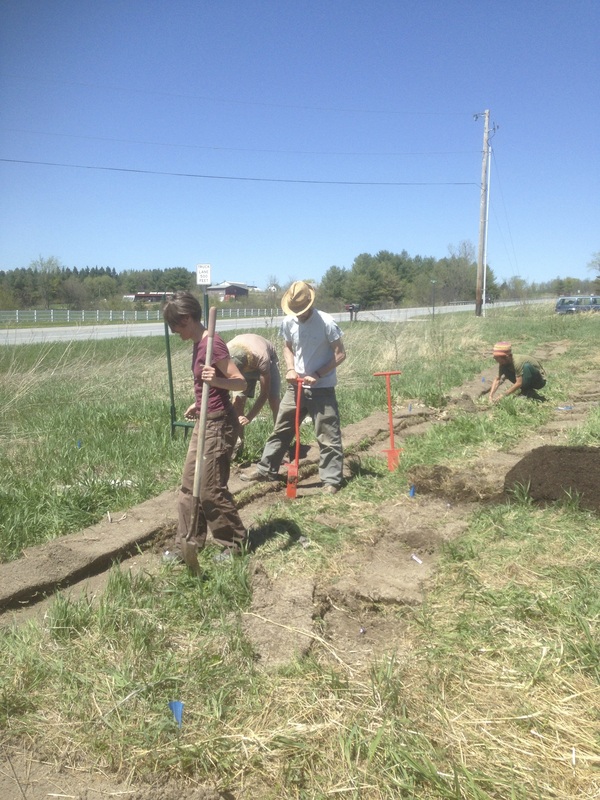
With over 2000 seedlings to install total, and a silty-clay soil that makes it very difficult to plant bare root trees in dug holes, I chose to use a planting technique known as 'notch planting' for this particular installation. Most of the seedlings I'd ordered for this project measured between 6-12" in height, so they had yet to boast significant root systems. Also, the fine, dense soil structure on my site makes the job of planting a tree rather challenging in that you usually need to try to break up chunky clumps of soil in order to have enough loose material to carefully pack around exposed young roots.
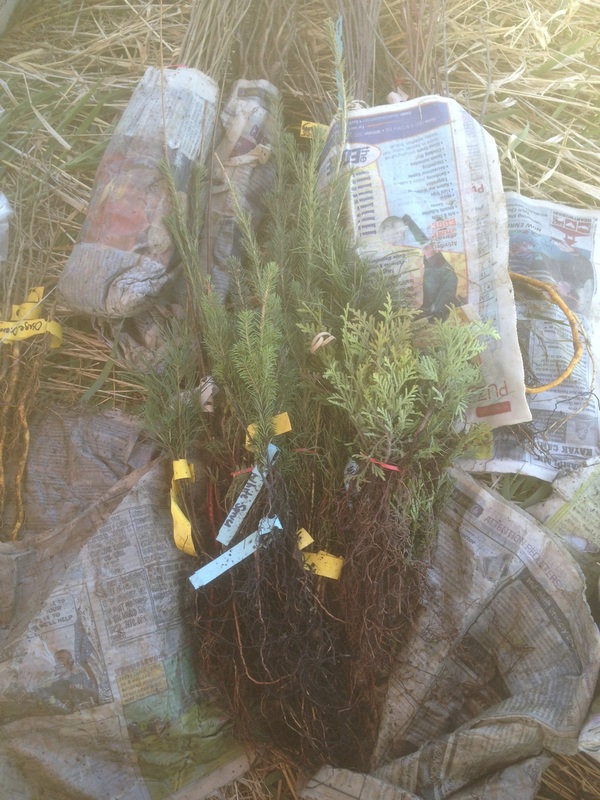
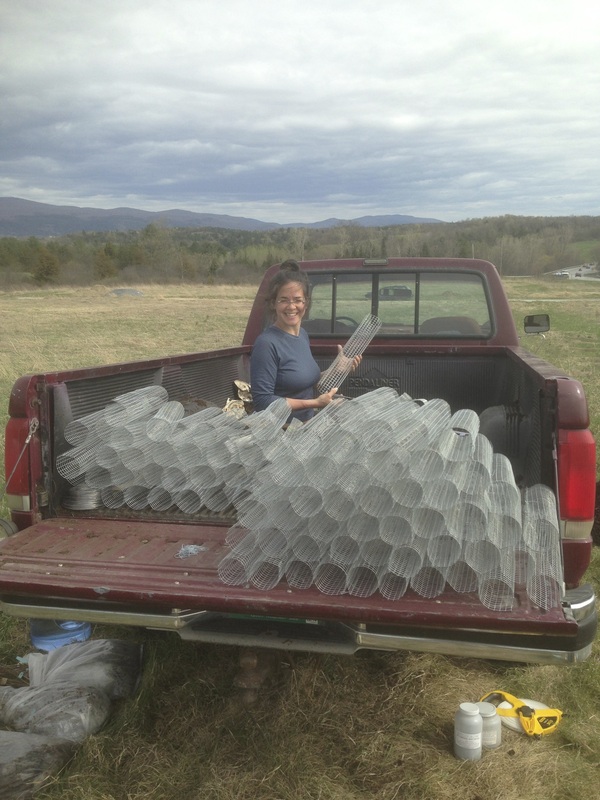
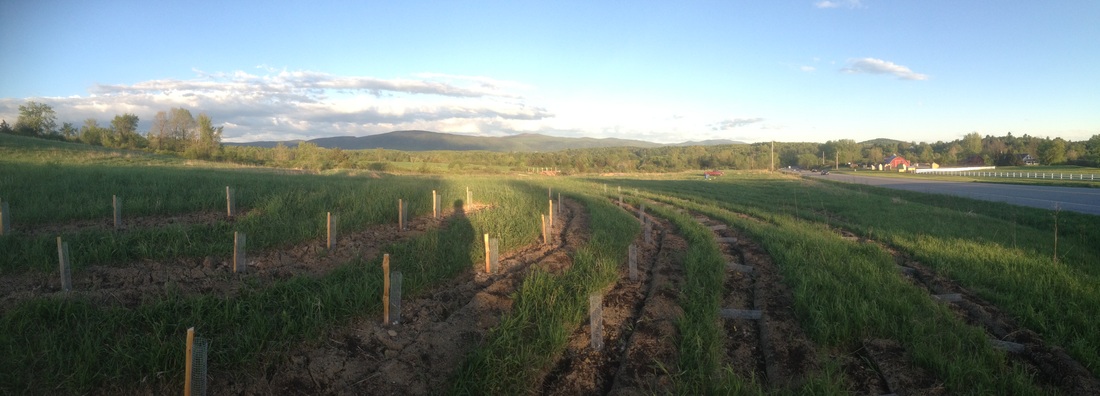
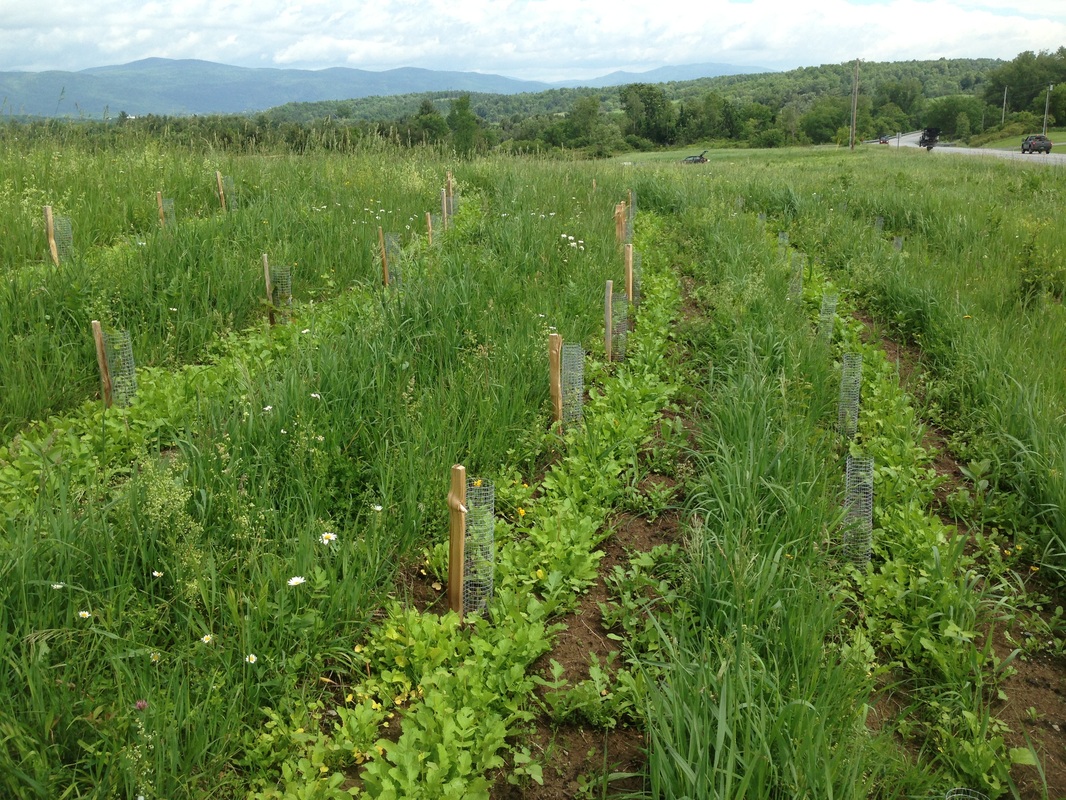
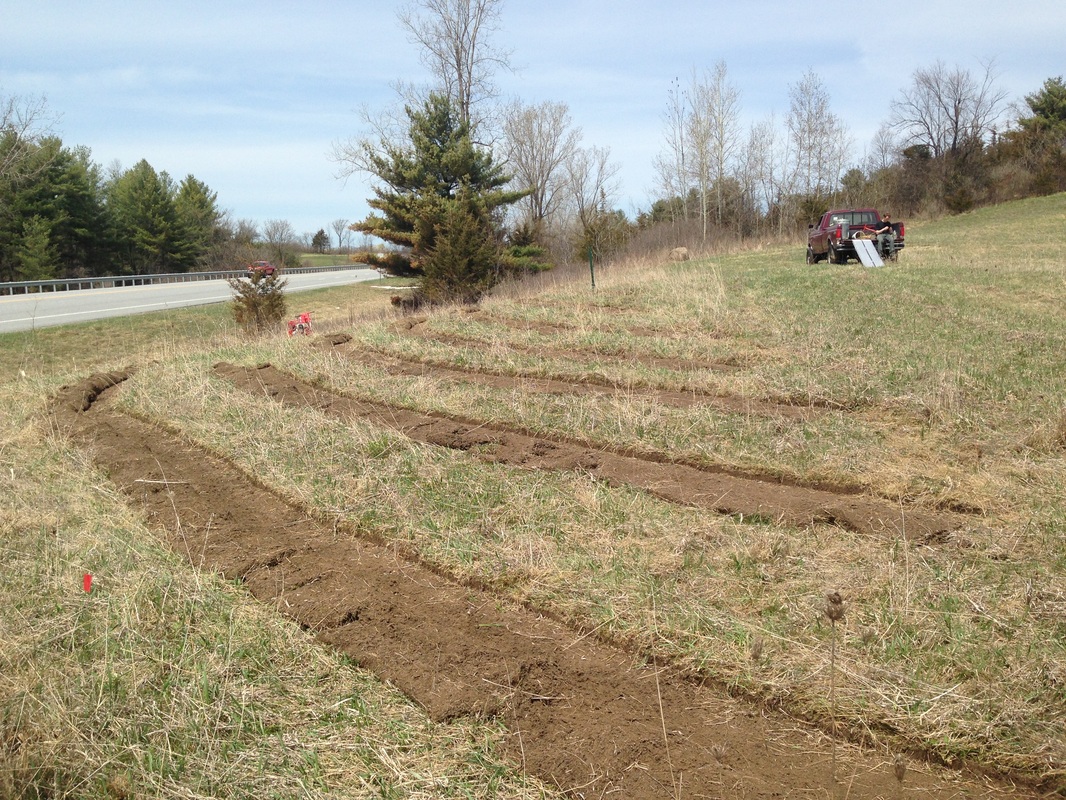
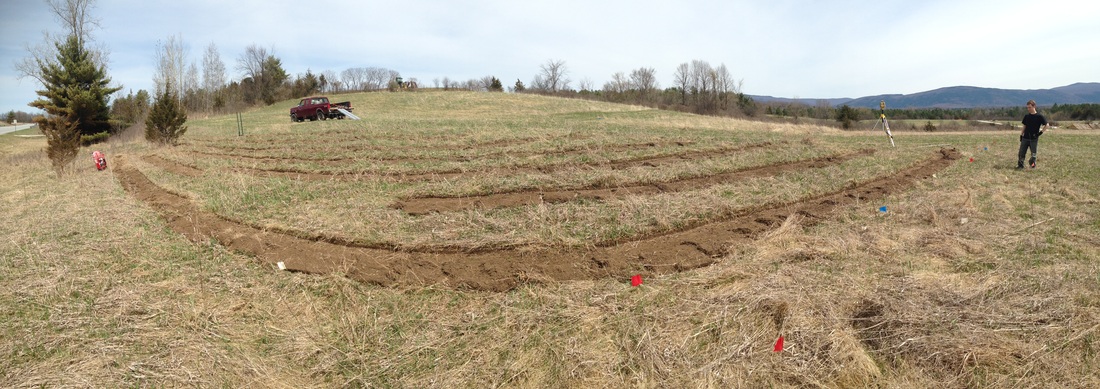
Notch planting utilizes a simple 'planting bar' to make a 6" wide slit in the soil, ideally just large enough to invite the seedlings' bare roots. This heavily-constructed tool amounts to little more than a blunt wedge attached to a T-shaped handle. You step the wedge into the soil at the desired planting location and attempt to match the depth of the notch to the length of the roots. Lightly wiggle the handle back and forth to open a wider notch. (Take care not to lever it back and forth too far or you end up creating a large pocket of air at the bottom of the hole that can be difficult to close up cleanly around the roots). Grab the seedling you intend to plant and inspect the root system, pruning any broken, dead, or damaged roots and then carefully 'swipe' the plants' roots into the notch, setting the plant at the proper depth - either at the 'collar' or transition between the roots and aerial parts - or slightly deeper. (Many hardwood species will tolerate deeper planting depths). Then use the planting bar to create a notch an inch or two uphill from the seedling and use the tool to firm up soil against the planting notch, removing all air pockets. Repeat this process another 2 or so inches uphill. I then usually use the tool to carve away the soil around the edge of the final notch, creating a smooth basin for water to collect just above the seedling. And then I carefully firm up the soil on either side of the seedling by stepping lightly around the perimeter of the young tree. In many cases I actually took one additional step to make for better root-to-soil contact in my clumpy soil. I first used a mattock to finely shave up some soil just above each planting location. I could then use this fine soil to fill in around plant roots before closing up the notch. Finally, I attached a plastic label around the base of each tree with the species name written in Sharpie. This not only should help me identify the trees later on should there be any confusion (assuming the Sharpie doesn't wash off or fade - which it likely will with time), but it also proved very valuable to help locate individual trees amidst the growing herbaceous vegetation before I had a chance to protect them with tree shelters. Although notch planting is by no means the most tender approach to installing your seedlings, I found it to have a very high success rate, and it allowed me to install my plants considerably faster than I would have been able to had I dug holes for each. Working alone, I averaged about 80 trees per day, but that also includes considerable time spent broad forking each planting site beforehand. In anticipation of this large installation, I sought out a tree planting machine - a tractor pulled implement that makes the job immeasurably faster. I was unable to find one available for rent, and I chose to look no further because the short (30') East-West orientation of my rows would not have suited a tractor-pulled implement anyways. But anyone considering a larger installation may well want to explore the potential to enlist in the use of one of these machines that make it possible to easily plant over a thousand seedlings in a single day with a crew of at least 3 people. To protect plant roots from drying out and slow their budding out with the coming spring, I kept the seedlings' roots wrapped in wet newspaper, stored upright with their aerial parts exposed to the air to prevent them from staying overly wet and potentially developing mold. Kept in a dry, dark place, it's possible to keep them dormant as such for several weeks. It's absolutely vital to keep roots hydrated - letting them dry out is a virtual recipe for failure. Prior to planting, I soaked each seedling in an inoculant slurry comprised of several species of endo- and ecto-mycorrhizal fungi. I purchased this product from Fungi Perfecti, although there are several others on the market. Knowing that I was asking quite a bit of my little seedlings to get established in an area that's been managed as a hayfield for the past several decades, I wanted to at least make sure they had the potential to develop mutualistic relations with symbiotic fungi. I realize that it takes quite some time to shift the balance in soil biology from an early-successional, bacterially-dominated matrix to an old-field or forest ecosystem with it's more fungal-dominated populations, but this felt like the best I could do given the limited advanced planning I'd done the previous season. This year I intend to surround each seedling with a 3"+ ring of wood chips to help add a woody component to the soil surface and make conditions far more hospitable for these crucial fungal populations. When it came to the actual spacing and plant selection, I'd already laid out a fairly logical approach to follow, so it became a matter of fitting my desired pattern into the landscape. My system varied as I continued to refine it, but generally I began by using landscape flags to lay out the location of the next 15 or so trees - I found that to be a nice 'batch size' to work with. I left about 1.5 paces between each plant - roughly 5-6' and tried to make sure each row was staggered or offset from the one above it. Because I'd planned to create a 'stepped' planting from west to east, I usually selected a bundle of plants for each successive batch. From west to east - a few lower shrubs for the western edge, 2-3 mid size trees, a couple of tall trees, at least one conifer somewhere within the central belt, and then finally any number of fruit or nut-producing species along the eastern edge, ideally with the lowest growing fruiting shrubs or small trees along the far eastern side of the row. In this way I maintained a 'quiver' of possible plant species in a moist bundle under an EZ-Up tent I successively moved along as I progressed, retreating under the tent with each new batch to select and organize my next set of plants before stepping out into the field to plant them. I found this approach worked very well. Handling 45 different species in a mixed planting with varying row lengths and a dynamic structure does not lend itself well to a pre-packaged, assembly-line style approach. So although it did take some time, I enjoyed the break I found with each successive batch to commune with the plants and think through my next set of decisions before needling to make them on the ground. Once I'd completed sections of the planting, I returned to apply some broad spectrum mineral applications (primarily Azominte and green sand) along with a thin layer of compost. And finally, because I wanted to make sure I got an edge on the competing vegetation, I broadcast a blended site-made mix of ten or so soil-building cover crop plants including, but not limited to, alsike, red, white, and sweet yellow clover; buckwheat; cowpea; tillage radish; field pea; fescue and a general pasture mix. After inoculating the legumes, I mixed 5 gallon buckets of seed together. Because I generally only needed to apply about 10 pounds per acre, I then made this mix far easier to spread by diluting it with a carrier - in this case I used sand. To do so, I filled the bottom inch or two of a bucket with the seed mix and then covered it with sand, mixing thoroughly. I kept adding batches of sand incrementally until the entire bucket was about 3/4 full with the sand/seed mix. This dilution made it far easier for me to achieve recommended broadcast density and allowed me to spread my seed investment over a much larger area. My final step was to make sure I protected my investment from the hungry droves of voles, mice, and rabbits. I'd already learned the previous year that small mammals represent a significant foe to any reforestation effort in my area. Girdling any and all young trees at their base (except for the gooseberries I'd planted), they'd inadvertently caused all of my previous installations to coppice (primarily Chinese Chestnut, serviceberry, hybrid willow, and hawthorn). I didn't want to take the same chance this year. so I opted to make my own hardware cloth screens for each tree. To do so, I purchased four 100' x 3' rolls of 1/4" hardware cloth. I started by cutting the 3' roll in half into two 18" rolls first using a circular saw with an abrasive blade, finishing off the cut with a sawzall (The circular saw blade was not wide enough to cut through the entire diameter of the roll). I then laid out the roll in 30 or so foot lengths, laying several layers on top of one another and used the circular saw with abrasive wheel to cut these long lengths into 10" wide strips. This length yielded a tree shelter with a 3.2" diameter. Four 100' rolls were enough to yield 960 shelters. At about $105/roll, this meant I had spent just shy of 50 cents per shelter in materials (I later bought several hundred 2' tall plastic 'TreePro' shelters for 90 cents each for the sake of comparison). With this pile of flat sheets then began a very long process of conversion into round, bound tree shelters ready for installation. We used a scrap piece of 2" ABS plastic pipe as a rough form, rolling each sheet into a rounded shape. Then we used a needlenose pliers to fold over the ragged edge of the shelter around the metal links on the opposite side at both the top and the bottom, tying it together. Finally, we began by making our own 'ties' out of a light gage metal wire. This proved very cumbersome, and after a few hundred, we modified our plan, buying bulk zip ties, making the process so much faster. I had plenty of opportunity to keep track of our progress and found that it took us about 1 minute to wrap and bind each shelter. I finished the process wondering if it weren't a better option to just buy the plastic shelters instead of making our own. I'm still not sure I've made a clear decision, but this year I'm back to ordering hardware cloth (although I'm planning to make the shelters 2' high this time around) so I suppose that says something. I definitely prefer the hardware cloth over plastic shelters for their superior ventilation, durability, and ease of installation. It was very easy to install the hardware cloth shelters. Because we'd cut the full roll of hardware cloth in half lengthwise, it meant that we always had one end that had a rough, jagged edge. We oriented these edges downwards, centered the guard on the seedling, and then put balanced, firm weight on the guard, lightly wiggling it back and forth until it was anchored at least 1.5" deep in the soil. This proved near impossible with the plastic shelters we'd purchased. The firmness of the clay completely resisted the plastic guard's edge, so despite the pre-assembled conditions of the plastic shelter, we ended up spending considerable time carving away a ring of soil into which we could place the plastic shelter's bottom edge, only to later repack the circumference with soil to lock it in place. Just one winter later, the freeze and thaw cycles seem to have loosened several of these plastic shelters, leaving the base of the trees vulnerable to rodent attack. The metal shelters still feel very firmly embedded in the soil, but I added a stake behind each for good measure. Because I had it, and I like making stakes, I rived out cedar and/or black locust stakes about 24" long by 1" square and used a hatchet to put a point on the bottom end. When I ran out of this material, I conceded and bought 3/8" by 4' long bamboo stakes, which although fairly easy to install, probably will only last a couple of years. With the exception of some early-season watering during the first few weeks of the season (we went close to a month with zero rainfall between mid-April and mid-May), and 2 passes with the weed whacker spaced out during the season, that it was for treatment during 2013. I would have loved to have made it out for a fertilizer application and also a heavy wood chip mulch application, but time, other projects, and financial resources all left these tasks for me to finish in future years. It still feels a bit early to project but by the end of last season, I'd say I had an 85% survival rate which is just fine as far as I'm concerned. I know I'll want to do some thinning as the hedgerow/'thicket' matures so this natural culling helps do some of my work for me. As spring grows closer with each passing day, I hope I find similar results in the coming year. This has been quite an educational experience for me. Probably the best yield to date, and perhaps the most important one, has been and likely will be, information. I hope that this detailed description has been of use to you. I've chosen to include it here as something of a case study in multi-purpose coppice stand installation. Your circumstances, goals, and resources will likely be quite a bit different than my own, but I hope you've been able to benefit from my own trial and error processes, learning from and integrating lessons I've learned along my path. As we approach another exciting growing season, may all your efforts be blessed, productive, and vibrant! Pre-planting site prep is crucial to the long-term health and performance of any planting - and it's one of the easiest steps to neglect. Because of woody plants' lifespan, taking the time to do this work upfront can't be overstressed. It becomes increasingly difficult to remediate soil compaction, modify water flows, balance soil fertility, etc after trees are installed and have begun to mature. If you're feeling rushed to carry out a planting at just about any scale, it may prove better over the long run to take a step back and use the coming season as an opportunity to improve the site conditions first so that your trees find improved conditions when you do get around to installation. Of course, 'the ideal' and reality often do not easily intersect. For my hedgerow installation, I chose to focus my site prep on four primary site qualities - soil compaction, hydrology, weed suppression, and fertility. Here I'll explore my approach to these considerations in detail. The attached videos and photos hopefully help clarify my verbal description. Layout of the planting was of prime importance at the outset. With a slope that changes from moderately steep to much more gentle over the course of 500 or so feet, I wanted plantings to follow a contour pattern. But one challenge here was that this orientation meant that the contour lines along these 30' rows ran in the short direction (the landscape slopes downwards from north to south, so the planting rows were essentially oriented from west to east). I'd intended to address weed control and herbaceous competition at the same time as I developed my planting layout, and I chose to try using a 'sod cutter' machine to do just that. The silty-clay soil on my site made tillage a less-than-desirable option as I was concerned about compaction during the wet period in early spring. Given the density of the planting - roughly 5x5' spacing - it seemed far too cumbersome to use a mini-excavator to disturb the sod cover and expose bare soil while developing a swale on contour type layout. Unsure as to the best way to proceed, I remembered my days working with a friend at his landscaping business. I remembered that we'd once rented a sod cutter to simplify the tedious, heavy work required to skim existing sod from new planting beds. Developed for the commercial turf industry, this gas-powered tool features an 18" wide adjustable blade that you can set at anywhere from 1-2.5" depth which vibrates back and forth once engaged, severing the roots of herbaceous vegetation so that it's then possible to roll up the sod into neat little 'Swiss cake rolls' for transport to a landscape waiting for a new lawn. Although I'd never heard of anyone creating 'sod cut swales', I thought it might make for a quick and fairly easy way to create a 3' wide, 'weed-free' planting bed, without tilling, while developing a swale-like berm on the downhill side of each pass. For roughly $75 a day, I was able to rent this tool, that while heavy, I was able to load and unload from my truck by myself along with a set of aluminum ramps. It took me 2 working days to cut the sod swales with the sod cutter. Each day, for at least a portion of the day, I had a hard-working helper to assist with the sod turning (thanks Nick Hollis and Jesse LoVasco!). I started at the high point in the landscape, using my laser level to mark out contour lines at roughly 4-5' intervals. Because contour lines aren't symmetrical, there was some inconsistency in the row spacing, but for the most part, I was able to choose a starting point that resulted in largely uniform rows. I'd lay out as many rows as I had landscape flags for, marking points every 10 or so feet, and then fired up the sod cutter, cutting the sod's roots at 2" depth. I wanted to cut the roots as deep as practically possible. The sod cutter was not made to handle the dense growth and heavy root systems of the old hayfield in which I was working, so I found it was a bit much to cut the roots at the full 2.5" depth. Although it would have been more work, I think the tool would have worked even better if I'd taken the time to mow the planting area the previous season and raked up the long grass before using the sod cutter, setting it aside for mulch after planting. Sometimes the tool bound up with the dense vegetation, and I had to stop to clean it out. But all things told, it largely perfumed well, doing exactly what I had hoped. After cutting several lines with the machine, we proceeded to carefully flip the cut sod rows downhill, sculpting the sod lengths into an on-contour swale berm. It looked great, and as I later found, performed exceedingly well. Almost too well. Our spring is typically particularly wet, but 2012 proved to be unique. Starting a few days before receiving my plants (around April 26) and continuing on for another 3+ weeks, we received no rainfall. Like zero! But then during the 6 weeks thereafter, we received over 20"! More than 2/3 of our annual rainfall in just a month and a half. With the clay-rich soils so prevalent on the site, I found that on-contour swales probably weren't the best idea, as this extreme weather event left standing water in the swales for multiple days. One dilemma I encountered when developing this sod-cut swale idea was where to actually place the plants within the swale itself. Knowing full well that the trees would be best-off on the elevated berm, I was reluctant to plant bare root seedlings through 2 layers of sod, even if the top layer was upturned. So instead I centered the plants within the 'basin' portion of the swale - doing my best to keep them set back from the lowest part of the basin. From this experience, I've learned that a 1% grade is probably a much better layout for semi-on-contour plantings on these soils. This would still give the planting a contour-esque layout, but it would gently direct excess water away from the base of the plants. Because we receive such reliable rainfall here, this layout could allow me to send this excess water into small hand-dug pocket ponds that connect several planting rows. Then during extended dry periods, we could simply haul buckets from these basins and hand water the trees. I've been experimenting with this pattern on a small scale in our vegetable garden and plan to do it on a 1/2 acre berry planting we're doing this spring, so we'll see how it turns out. After one long workday, we'd created a sod-swale belt 30' wide by about 400' long - I still had another 400' or so to go. I ended up renting the tool once again about a week later to complete the job. Although I really liked the look and orientation of the contour swales, I could clearly tell that I was not going to finish the job if I continued to take the necessary time to use the laser level to lay out each row. At this point, I'd reached a much flatter stretch of the property, and so I chose a new approach. Given that I'd planned roughly 5 rows of plants from east to west, and that much of the time spent cutting the swales was spent when I had to tediously turn the machine around at the end of each row, I instead started to lay out just 1 contour swale every 50 or so feet. In between these stretches, I ran my rows cross-contour (north and south), creating 5 rows at roughly 5' spacing. This proved a much faster approach. Then as I removed the cut sod lengths, I used it to create a berm within each row, uphill from each plant. Although it didn't create a long line that followed contour, it allowed me to create micro-basins for each individual plant that also served to very effectively store water while creating a zone of bare soil around each tree where I broadcast a diverse cover crop seed mix after planting. One operation I definitely would have done beforehand was subsoil plow the planting zone to ameliorate the soil compaction that resulted from decades of hay harvest. While I have a Yeomans keyline plow, I'd already agreed to rent it to a farmer on the other side of the state during the early spring, assuming that the traditionally wet spring would make for poor conditions to subsoil plow my clay-rich soils. I of course kicked myself when we enjoyed a stretch of extended dry, which would've been a perfect window for subsoiling. So I instead took the manual route, using the heavy duty 'Meadow Creature' broadfork to hand prep the soil around each individual tree. It was a lot of work, but it did give me an opportunity to address soil compaction at each micro-site before planting. In the next installment, I'll describe the approach we took to installing the hedgerow plants, the plant layout, and the additional steps involved in giving the plants a head start. In my last post detailing the selection and design process for a multi-functional hedgerow on my developing homestead in Vermont's Champlain Valley, I described the 11.5 acre parcel, explained my goals and the desired functions for this 1/2 acre planting, and discussed the species selection process. Here I'll describe the way I came up with the planting layout and design for this project.
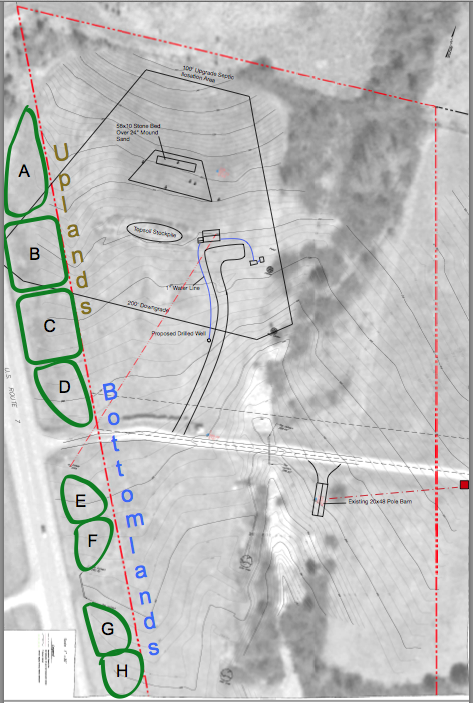
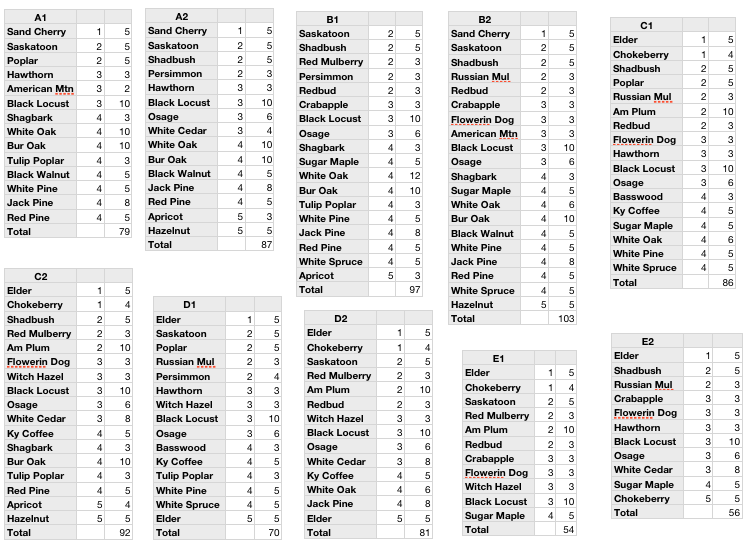
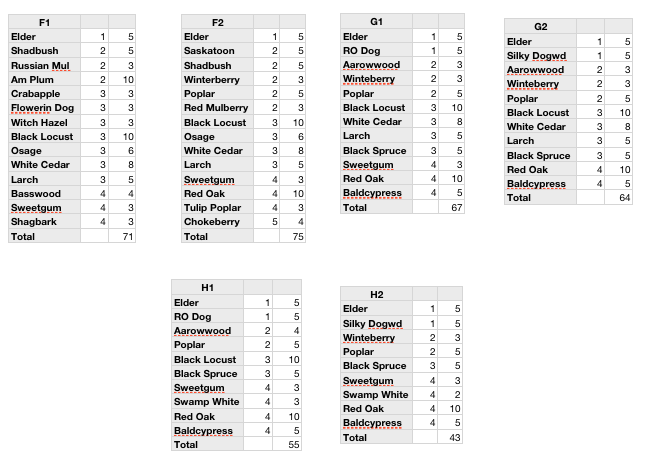
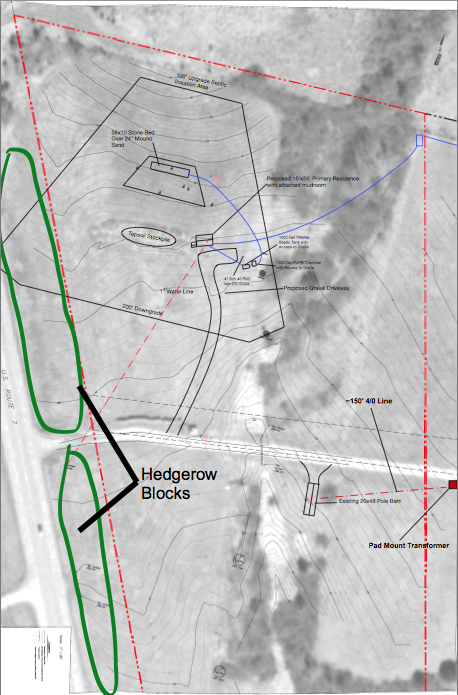
With such a broad diversity of species on the way, I looked for simple patterns I could use to break up the landscape into smaller, more manageable groupings. As the topo map of the site shows, the property has a southern orientation, and the slope transitions from being fairly steep - perhaps 12-15% grade along the northern 1/3 to somewhat flat 3-5% as you progress further south. My observations during the first season there had suggested that the steepness of the slope strongly correlated to the depth of the water table and the relative wetness of the soils. Generally, my site has heavy clay soils - called 'Vergennes clay' locally. A soil test carried out by Logan Labs in Ohio found that the lower part of the property is mineral rich with a high cation exchange capacity (13.28). pH is 6.2 and 7.36% organic matter. A soil particle analysis revealed the extent of the fines in the soil matrix - 44% clay, 44% silt and 12% sand. Probably the strongest single inspiration compelling me to experiment with such a diverse planting was the incredible species diversity in the 40 acres of woods I'd also purchased. This remnant patch of 'valley clayplain forest', a now relatively rare ecological community that once blanketed the vast majority of the Champlain Valley, supports close to 30 species of woody plants. Something of a transition zone between the northern hardwood communities comprised of birch, maple, beech, cherry and hemlock and the oak-hickory forests that cover large expanses of the forestlands further south, the heavy soils contribute to significant site productivity, despite the challenges of an often high water table. In short though, I knew this land is capable of supporting a broad diversity of woody plants. All this information suggested a fairly simple pattern by which to plan. I broke the ~850' long north-south planting belt up into 2 broad sections - 'uplands' and 'bottomlands' - based on the slope and observed tendency to pool water during heavy rain events. This gave me the ability to start to categorize species based on their soil moisture tolerances and start to develop a skeletal framework to design the planting. Secondly, I knew that I wanted the planting to have a 'stepped' character from west to east like the design of a classic shelterbelt/windbreak - starting with shrubs and small trees along the western edge, and steadily increasing in height to the east. I had planned a very dense planting - roughly 5-6' between individuals - because the primary function here was the privacy screen the plants would provide. Since I know that the planting will suffer some mortality, this gives me some wiggle room as well once gaps begin to develop. And because my main intention was not to manage for mature 'standard' trees but rather more of a thicket of coppice stools, this high density should allow me achieve high productivity in a fairly small space. After all, it's easy to cut down a tree if I find it too close to another 5-10 years down the line, but I can't easily (or economically) plant a 10 year old tree to fill in a missing gap. So at 6' spacings, this 30' wide belt would give me about 5 'rows' worth of plants from west to east. This gave me the other structural pattern I could use to start to refine my planting layout. I assigned each species a number based on the 'row' I deemed it best suited with 1 being the lowest row on the western edge, 4 being the tallest, and 5 being the position most interior to the property - the one for which I'll have most easy access. Since another key goal here is fruit/nut production, I chose to reserve the innermost row for species that provided this function - hazelnuts, plums, apricots, elderberry, serviceberry, crab apple, aronia, etc. This gives me the most convenient access to these plantings for grafting (none of these are selected cultivars), pruning, harvest, etc and it also gives them a prime solar position given that they will receive abundant sun from morning on through about 3 or so in the afternoon - even once the rest of the hedgerow is mature. With these 2 categorical divisions in place, I broke up the planting belt into eight 90'+ long belts and created a patch grouping for each zone along with projected numbers of individual plants I'd need (see attached tables). Because I'm hoping to ensure year-round privacy screening, I made sure to include at least one conifer species in each grouping, and upon planting, including one or more conifers in each individual 'row'. The attached site plan shows the rough distribution of the 8 planting blocks from north to south, and the tables show the 'plant community' blocks I developed. I broke each zone into 2 parts, each then theoretically representing half of the block (A1 and A2 for example). The first column lists the species, the second indicates the structural role they fill - level 1-5 depending on their positioning from west to east, and the third column shows the rough estimate for the number of individuals planted in each block (it turns out I overestimated the number of plants I'd need in the field by about 20% - I either planted these additional plants in nursery beds or potted them up). In the next installment, I'd discuss the strategies I used for site prep, in the field layout, and planting. Happy 2014
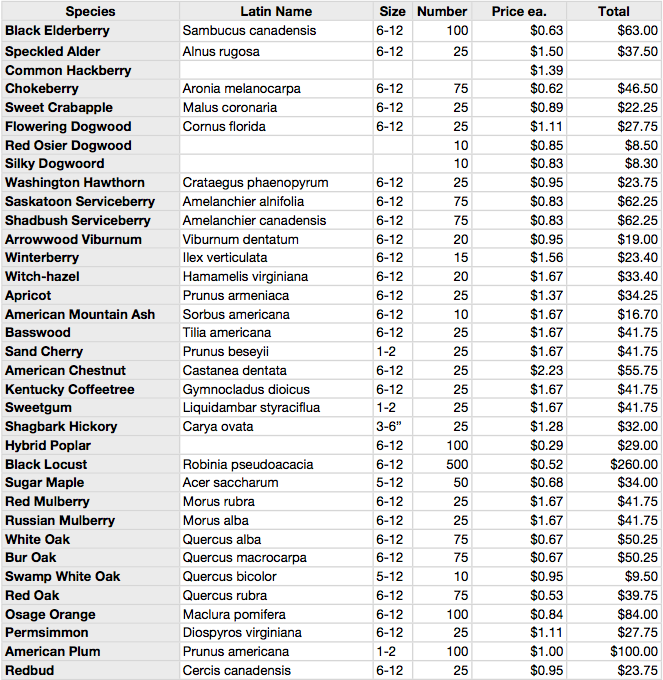
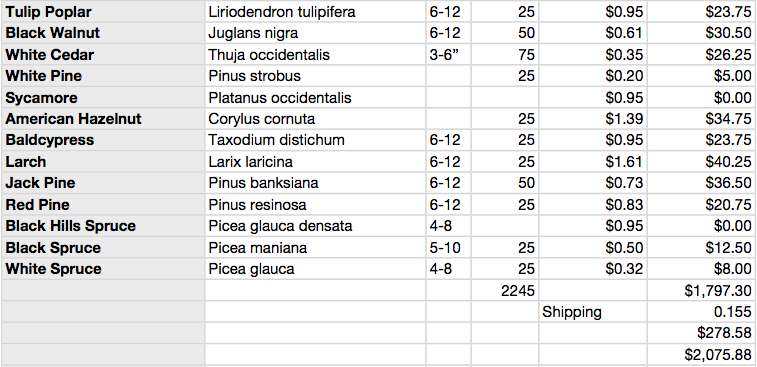
This is the first installment of a multi-part series describing a diverse hedgerow I planted in the spring of 2013 that I plan to manage as a diverse, multi-functional coppice thicket. This initial post describes the site, planting goals, and the plant selection. There'll be more to come in future weeks. My hope is that this 'case study' offers readers intending to take on their own planting projects some food for thought. In the spring/summer of 2012, I purchased property in Vermont's Champlain Valley. After more than 6 years 'on the market', I bought 2 separate lots comprising 52 acres (a hayfield comprising 11.5 acres and a 40+ acre woodlot) - a little over one half of an old Champlain Valley dairy farm on Route 7 - 3.5 miles north of the town of Middlebury. With dreams of establishing a productive homestead consisting of multiple overlaid enterprises, my property search had been nearly 8 years in the making. I was drawn to this site because of the location, the price, the topography and aspect, a series of small tributaries running through it, the clay soils, the easy access, the diversity of woody species, and the frontage on a major Vermont highway. With plans to build a house in the very near future though, this frontage and convenient access also came with a significant privacy cost - a quality that drove a strong inner debate as to whether this would be the ideal place to make home. I decided that this challenge would offer an incredible opportunity to transform this frontage into a riot of production - a multi-layered, multi-row, multi-species hedgerow spanning nearly 1000' from north to south, encompassing just shy of 1/2 acre and including close to 800 trees and shrubs. The perfect opportunity to get to work establishing a diverse coppice-with-standards-style thicket in the spirit of the agroforestry model that Dave and I have been researching and writing about for the past 3 years. This project became my primary goal for the spring of 2013. Goals From the outset, this installation was to serve several interconnected functions. First and foremost, I wanted to establish a dense visual break between the property and the highway. The rolling, south facing hayfield offers great views to the south and east, but is also pitched in such a way that much of the lot lies fully on display to northbound traffic. Despite this, it won't take more than 6-8' of growth to completely screen passers-by views of the property - something that the planting should easily create within 5-10 years and a quality I could readily maintain by coppicing. Because I also intend to develop several on-farm enterprises and maintain an active farm stand, I also hope that the hedgerow will act to draw attention to the property - a paradoxical quality given that the primary goal is to screen what lies behind it. A longtime lover of woody plant diversity, I wanted to include several dozen species, creating a dynamic, multi-layered woodland thicket with varying textures, sizes, colors and shapes - something of a mini-botanical garden. A living classroom where I can teach tree ID as well as coppice management. Given that the property lies along such a well-traveled thoroughfare, it seems only sensible that it create some visual interest for commuters, offering them an opportunity to watch the installation grow and evolve over time. As such, I've come to imagine it as something of a living billboard for lack of a better term. Production - Of course production was and is a primary goal in establishing this system. With 45 different tree and shrub species represented, I seek to develop a system that yields polewood, shade, wind protection, fuelwood, fruit, nuts, and perhaps most importantly, information. I'll describe the layout and design of the planting a bit later on, but generally, my goal here was to start to create a rough framework to enable me to produce raw materials and some food, while learning about what species do best on my heavy soils in chilly, wet zone 5 Vermont. Plant Selection When it came to pant selection, I used an approach I'd best describe as 'scattershot'. Because I am not relying on this hedgerow for food production, the tree lover in me instead chose to focus on functional diversity as I selected plants. Because of the sheer number of plants I'd intended to purchase, I looked to the wholesale nurseries I'm most familiar with - Lawyer's, Bailey, and Cold Stream Farm. Moderately overwhelmed by the sheer number of options, I ultimately narrowed things down by searching a single nursery's catalog - the Michigan-located Cold Stream Farm. With a climate most analogous to ours here in Vermont, it seemed to me to be the best place to source plants adapted to this growing zone. That said, when I asked for provenance details (the origin of their seed stock) for several different species, I was told they collect from so many different suppliers that they do not have a definitive answer, meaning that the genetics they're maintaining may come from warmer, drier climate zones. That said, I proceeded to create something of a 'wish list' of the species I was interested in trying. Most nurseries offer a multi-tiered bulk pricing system so it's often far cheaper to order 10, 25, 100, or 500 individuals. This was the general structure at Cold Stream, so I went ahead and built a spreadsheet with species names listed and the price per individual at the bulk tier that seemed best-suited to the scale of my planting. I proceeded to do this for their entire catalog, and several hours later, found the sum of my order in terms of both cost and total plants…. about $1700 for 2200 6-12" seedlings. I was surprised it was so affordable. Based on my very rough calculations, a 1000' long hedgerow, 25' wide, with individuals spaced 5' apart (very dense!! - intended to quickly form a tight wall of vegetation and create a solid coppice stand) would require about 1000 plants. I also wanted additional plants for a planned shelterbelt, in addition to 500 black locust seedlings destined for a dense 0.6 acre multi-species coppice-with-standards patch. I soon thereafter found a friend who was also planning a mass planting for his property, and we together developed a combined order that enabled us to finesse our numbers to best take advantage of the bulk pricing discount. The attached images show a topo map of the 11.5 acre parcel (south is down) with the planting area encircled, as well as the list of plants I'd selected. Note that I purchased nearly 3 times as many plants as necessary for the hedgerow. I put close to 400 in pots and another 800 or so in a nursery bed for the season. Soon enough, I intend to add posts describing the hedgerow design and layout, the site and planting prep I used, the planting process, predator protection, and successes and challenges during the 2013 season. I'll post the next installment in another week or so. Thanks for reading! I tried posting this back a while, and had technical difficulties. Hope it gets posted this time!
------------------------------------------ Hey Everyone! It has been a long while since we gave you all an update--our apologies! Here's where the coppice agroforestry book stands now. Mark and I continue to plug away. We are in the "deep middle" of the project now, which can be a challenging space, but we steadily progress. Without getting into too much detail: Daniel and I continue to refine the databases: we have finished the in-breath phase (i.e. we've collected all the information we plan to in order to build this immense resource) and we've been synthesizing and editing all our collected information for a while now. At the same time, the first four (out of a total of 8) chapters have been fully fleshed out with all relevant info from the 700 scientific papers we gathered and over 40 books integrated into Mark's brain dump (this is essentially our third manuscript edit), and meanwhile Dave is editing those chapters to find and fill gaps, smooth out the writing and attempt to cut the word count down to size, making for a more readable, information-dense resource. Additionally, to help ensure our book meets the practical needs of growers, we have also set up a small group of farmers to act as manuscript reviewers starting in spring. Their feedback will help inform our final manuscript edits which we anticipate will happen in the summer or early fall of 2014. All of this of course takes considerable time, and both Mark and I have been winding up for an especially big push this winter. To assist us towards that end and help guide and support our manuscript development, we are pleased to report that we have begun negotiations on a contract with a publisher. And a few days ago we submitted a USDA SARE grant that will hopefully secure some additional funding come March of next year. We've also been setting up a nonprofit fiscal agent to help us fundraise for the project - we hope that each of these combined will allow us to work on the project full time--which, if we can do that, would mean we can have the manuscript complete and submitted to the publisher in a year or so. Thanks again for your support and for your patience! We feel excited about what we are producing, and we feel confident your investment in us will be well rewarded by the outcome of the project. Below is a screen shot of the species editing layout for Table 1.1 of our databases, showing you the data we've pulled together for the basic table of North American (and a few other) species (834 species right now)--this is where you will go when you have a list of the species on your land and you want to know whether they resprout or not, how they resprout (that is, which resprout physiology they have, and therefore how one manages them), and how to propagate them. Table 1.2 will have fewer species than this; it will include all known decently-resprouting and reasonably useful species, their tolerances and preferences, and an index to which other tables in the book have detailed information on their uses. Use tables will include: timber uses and wood quality, basketry uses, firewood uses and quality, edible and medicinal uses, uses by native people for craft and artifacts ("ethnobotanical uses"), woody ornamental cut flower uses, fodder use and nutrient content, other uses, and toxicity. All of these tables are now in various stages of the editing and consolidation phase. Table 1.1 is virtually complete! A few more days of doublechecks and final species choices and it should be done, at least for now! Needless to say, this is pretty grueling work, but it's fun in some ways too, and satisfying to have turned the corner into the long home stretch and made some progress down that stretch. Peace and blessings! And Happy Thanksgiving to all of you folks in the USA--we extend our thanks to you for your ongoing support. Dave and Mark While I don't want to encourage you all to start asking us questions--we would rather focus on writing/editing the book and pulling together our species databases--Mark and I did get an information request from one of our Kickstarter subscribers recently that I responded to because I was in a place to actually try using all of our databases for the first time to answer his question!
This person asked: "I've got Robinia pseudoacacia growing on some east facing, moist slopes but am looking to plant some locust on a south-facing, droughty slope. I thought the drought tolerance of the R. neomexicana might be a good fit. Any thoughts? Do you know of anyone in the PNW that has tried it?" I took the opportunity to use our database resources to give him a quick response: "Here is some of what we have in our database on R. neomexicana: It sprouts from stumps and root crowns. New Mexico locust spreads by rhizomes, forming dense thickets. Because of its rapid growth and prolific sprouting, efforts are made to suppress New Mexico locust, especially after timber harvest. However at least one reference says it grows slowly, so it seems there is some conflict in the data on it, in that if it grew slowly efforts to suppress wouldn’t be noted, probably. It is considered to have high hedge tolerance. The following reference has some data on its use as a fodder crop: Urness, P. J., D. J. Neff, R. K. Watkins, and Rocky Mountain Forest and Range Experiment Station (Fort Collins Colo.). 1975. Nutritive Value of Mule Deer Forages on Ponderosa Pine Summer Range in Arizona. U.S. Dept. of Agriculture, Forest Service, Rocky Mountain Forest and Range Experiment Station. This ref states that leaves in June had crude protein of 25% (higher than alfalfa) but they had very low digestibility for mule deer (only 39%); may be even less digestible for cattle, goats, etc., but that is a guess on my part. We have no data on its use/quality for firewood or medicine. The bark, root and seed are said to be poisonous by one reference, but there is also evidence of the flowers being edible, as well as the fresh seed pods and dried pods, too. No evidence of basketry use that we have found. It is used for erosion control. It's a multistemmed shrub: implication: it may not yield poles of as high a quality or large a size as R. pseudoacacia. It has been used for fence posts and fuel. It is of little use as lumber due to its small size and limited distribution, but the wood is hard, heavy, elastic and durable. Native peoples used branches for cradle boards and arrow shafts and the wood for high quality bows. The USDA says it grows to 4 feet tall in 20 years, which seems rather slow and may not be very useful to you, though its max height is 25’. They also say it is only MODERATELY drought tolerant. So as for your exact question re: drought tolerance on south facing slopes: I’d say black locust is probably a better bet, both in terms of drought tolerance and in terms of usefulness of the material. I do not know of anyone working with R. neomexicana. Perhaps Mark does." The fact I was in a position to relatively easily pull up this range of information, gathered from dozens of different resources, demonstrates the reality that the coppice/resprouting species databases are turning the corner. We have as of today or yesterday, ended our "in breath" of gathering information from all over the world on almost 900 (mostly North American native) woody plants, and are beginning the long and tedious process of editing our databases to consolidate the information into useful form. The response to our questioner gives you a sense of the kind of information we have gathered, even for a relatively obscure species like Robinia neomexicana. We are getting there folks, we are getting there! As I said to someone recently, we are at the apogee of the elllipse--the point furthest from the center of the ellipse, and are turning the corner to begin heading back home and bring this thing to completion! Given that it has taken us three years to get to this point, we are hoping that it won't take us three more years to get back from this point. I think we are gathering speed. But life throws its curve balls, so we don't want anyone holding their breath. But it will be a damn fine piece of work when we are done, that is for sure. Hi folks
We recently spent some time exploring some fantastic on-line resources on coppiced willow biomass production for heat and electricity from the Cornell College of Agriculture and Life Sciences. While we plan to only truly skim the surface of short rotation biomass coppice systems in our book, the fine folks at Cornell (amongst others) have done much to help develop the state of the art for growers in North America. While short rotation forestry (SRF) presents a different scale and end product than much of what we'll be exploring in Coppice Agroforestry, we absolutely believe there's strength in diversity and that these systems may be of direct application to some of your lives and livelihoods. Check out the videos below to learn a bit more about the types of the planting and harvesting equipment used to manage these systems and marvel at the ingenious technology that's gone into their development. http://willow.cals.cornell.edu/videos.html#video10 Best wishes and happy autumn, Mark and Dave Happy September friends
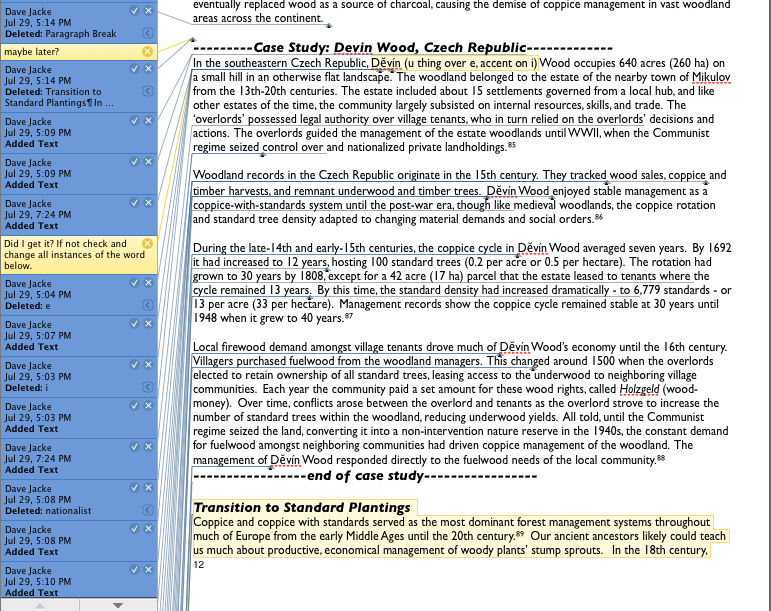
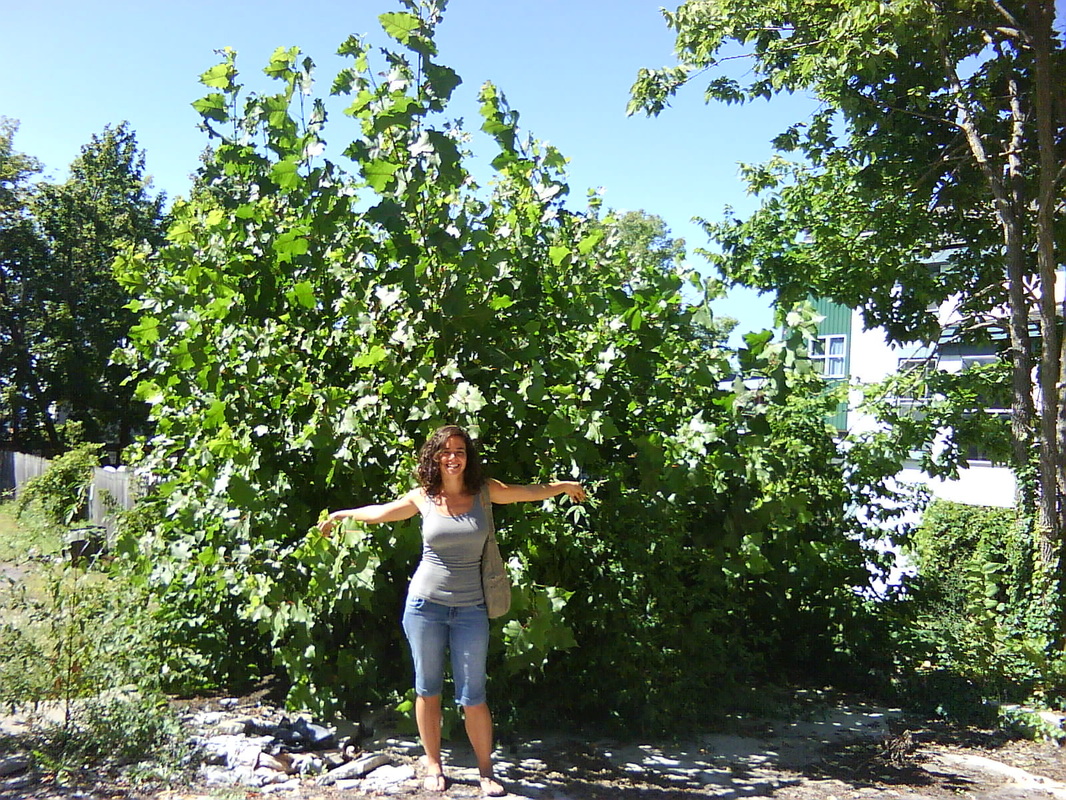
Can it really be that we're rapidly approaching the equinox? Yet another growing season feels as if it's coming to a rapid close. While Dave and I have been remiss in keeping you fine people updated as to our progress on Coppice Agroforestry, we'd like to share that we're still steadily making headway, though the height of summer; back to back workshops, design courses and speaking engagements; new land purchases (Mark that is, in New Haven, VT); and occasional free time invested in cultivating our personal lives has claimed much of the past six weeks. As much of that work begins to slow though, Mark will once again resume part-full time work on the manuscript, while Dave and Daniel Plane continue to forge ahead fleshing out the ever-expanding coppice species database. We're still so deeply thrilled to be immersed in this process and are continually learning, reassessing, refining and framing our thoughts, findings and experiences. We're both carving out much of the fall/winter months to bring the manuscript to a point where it should be ready for refinement into a finished work and we're feeling ever-confident that we'll be making an invaluable contribution to the expansion and development of the state of the art of coppice agroforestry. From my end, Dave just recently sent me his edited version of Chapter 1 - A Cultural History of Coppice Agroforestry. I've only just begun to pour over the myriad changes and comments he's made, and while positively overwhelming (said with honest gratitude), I can most definitely tell that the end results of this back and forth will result in a highly-readable, enjoyable, well framed and thorough end product. This is our 3rd round of editing to date and each time around, the book becomes more refined. I've attached a screen shot of part of a single page of text to show how thorough Mr. Jacke's editorial comments and changes are! In the meantime, I'm working through each individual chapter, identifying gaps, fleshing them out, working to stitch the pieces together and integrate relevant academic journal articles into each from the monumental literature database Dave has assembled. Now deeply immersed in Chapter 3 - The Ecology and Biology of Woody Plants (the book comprises 10 chapters total), I've read over 80 journal articles that I'm going to begin integrating into the text this afternoon to further expand on how coppicing works at the level of the individual, patch and community. It's an ever-enlightening process. I include a photo below of a cottonwood stool (Populus deltoides) that I pass fairly regularly on my journeys on foot around Burlington. In just a single season, this insanely vigorous stool has put on well over 10 feet worth of growth with stems well over 1.5" in diameter! It's incredible. And this is just a 'weed tree' growing along the edge of an old building foundation! Not bad! Thanks to Ammy for offering some scale As far as Dave and Daniel's progress on the species database, we now have the Coppice-ability, Timber Uses, Basketry, Edibles database first drafts complete, and the Medicinals and Other Uses databases are not far behind—though they still need a lot of editing. We also have the first round of fodder research—gathering references from all over the world—almost complete—only two more genera to go out of 28 we focused on, but we've gathered over 600 references relating to the fodder use (crude protein and digestibility, primarily) of 75 genera along the way (thanks to our various volunteer researchers for their help, and to the indefatigable Daniel Plane for his ongoing efforts). We now have the unenviable task of combing through all these papers to dig out the nuggets we need for the species of interest and trying to make sense of them. Now that we're back in the saddle, we'll make more of a concerted effort to keep you all abreast as to our progress and what new insights pop up in our mind's eye. We deeply appreciate your patience and support and continue to pursue our work with diligence to create a product that will serve our community for years to come. This has been an enormous process but we're both still feeling deeply energized and inspired. Thank you for being there for us! Mark and Dave Hello folks
Warm winter greetings from a snowy Vermont. We hope this message finds you all very well, and we're happy to share more details about our progress on the book. I recently 'completed' a milestone in the process, having integrated detailed notes (230 pages worth) from nearly 40 books I poured through during the past 4 months into our still-expanding manuscript. I included a photo of the stack (of books) in a previous update, but it included resources on traditional crafts, plant physiology, masonry heater technology, indigenous building techniques, coppice management and ecology, forestry and folklore. It proved to be a very involved process but I think it will pay off greatly in rounding out our resource and making it as comprehensive as we can. I'm about to segue into the next phase in the writing process, reading through the manuscript, editing and refining and identifying gaps. From there, I plan to start to utilize the extensive literature database Dave has created along with a few volunteers to help root our findings in existing research. It's another big step, but we're confident it will help make our end product that much more robust. In the mean time, Dave and our super-diligent, hard working friend Daniel Plane have been fleshing out the species database and are beginning to take steps towards refining the categories we'll ultimately include in the listings in the finished book. Including over 700 native, naturalized or otherwise useful woody plants that can be managed using coppicing and pollarding, we ought to have the most useful, comprehensive and intentional resource on the best-suited plants for this type of management. I've got more updates in the works soon - namely reflections on our recent workshop/workday/'copp-mob' at the Sawyer homestead in Woodbury, VT where we initiated a coppice rotation amongst a 3/4 acre stand of red maple. It was a great day and remarkably impressive to see what a team of 15+ people could do in only a few short hours! Well wishes from us as your winter proceeds! Keep up the great work I'm sure you're all doing. With appreciation, Mark |

 RSS Feed